I’ll start a series of articles about the making of a weatherstation.
A weatherstation is a perfect project for starters, and you can make it as complex as you wanted. For me, it is also a focus to learn MicroPython.
My intended audience are those who want to learn MicroPython to control microcontrollers, such as ESP8266, ESP32 and other microcontrollers which support MicroPython. Each microcontroller does have variations in usage of MicroPython.
I’ll concentrate upon ESP8266 which includes development boards such as WeMOS D1 mini, Adafruit Feather Huzzah ESP8266, and NodeMCU.
I’m a software engineer (actual a lecturer in ICT technology including Internet Of Things and robotics) which means that the programming is my main focus. Electronics are ‘borrowed’ from websites as Instructables and hackster.io, Google+ groups, Youtube and books. I’ll mention them in the reference section.
Variations of MicroPython are CircuitPython (Adafruit)(*) and MicroPython-esp32 (*) (WeMOS Lolin32) which I might describe in separate (blog) articles. (*): URLs visited on 12th August 2017.
What will be the main functionalities?
- measurering temperature and humidity, and displaying it on the OLED display.
- microcontroller ESP8266 with MicroPython (1.9.1+)
- storage of sensor data on a SD-card and/or on the web in a SQLite database. This gives the possibility to build a dashboard, yourself. Access to a Wifi network is required.
- powered by 5-12 Volt (USB-wallcharger) , a LiPo battery or a powerbank. The LiPo battery is attached to the battery-shield, and charged when a power supply of 5 V is attached.
- additional IO, and maybe other components. I’ll see what comes along.
Some optional functionalities which I’ll have to investigate:
- ESP8266 in deep-sleep mode to save battery. Voltage of attached LiPo battery is monitored.
- storage of sensor data using an online IoT-service, such as ThinkSpeak, Tembo, or another one (with MicroPython as a client).
- weather data from an online weather service, such as OpenWeather. Nice to compare them with the local measured values.
- maybe more …
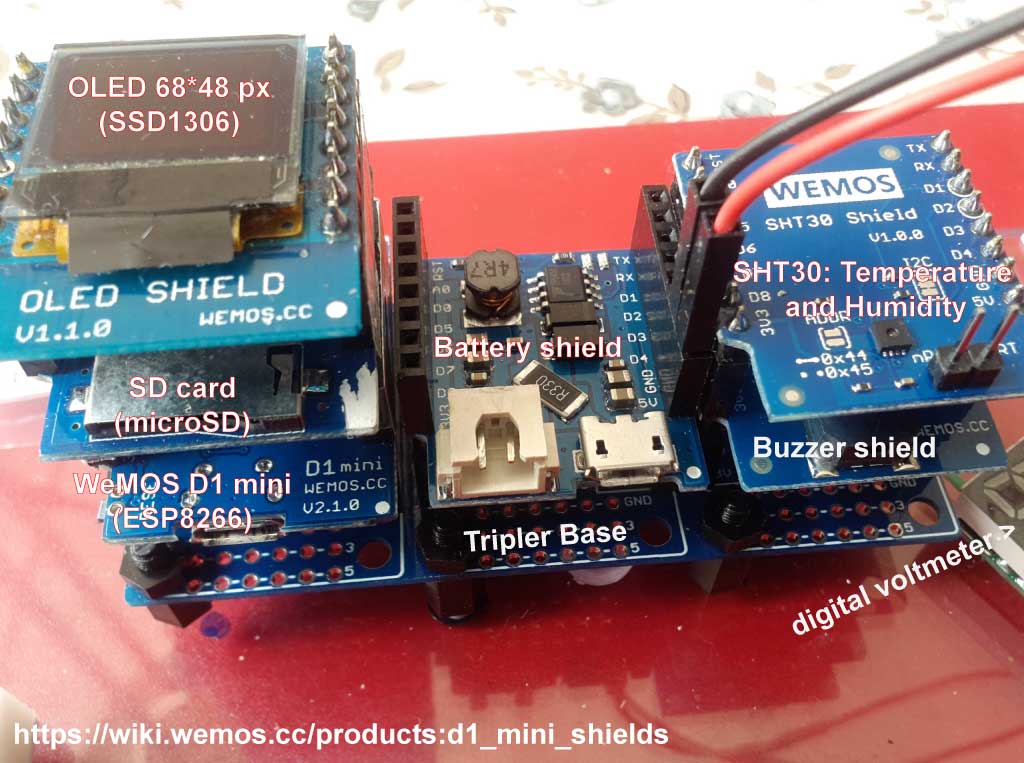
Hardware My system will be assembled from a WeMOS D1 mini (ESP8266 microcontroller) and several shields. Included will be a shield for measuring temperature and humidity (SHT30), an OLED display (64*48 px), a Real-Time Clock for a timestamp (RTC-shield), for local storage (SD-card), a Buzzer for alarms (Buzzer-shield), and a battery-shield. Most, if not all, shields are supported by Micropython.
The WeMOS D1 mini contains an ESP8266 microcontroller which means it has builtin Wifi capabilities, supported by MicroPython.
Some additional electronics will be used for deep-sleep, and on the way I probably will include ad-hoc extensions not forseen.
Reason for using WeMOS D1 mini and shields is simple: I have them and want to make use of them. In the following episodes I’ll probably will mention some alternatieves which makes use of separate components. For example TMP36 (temperature sensor) and DS18B20 (temperature and humidity sensor with 1-wire protocol), and so on.
Image of the proposed system
 |
The RTC-shield is coming soon. Of course a proper chase needs to be find or made too 😉
The WeMOS D1 mini and shields can be obtained from the official WeMOS Store at Aliexpress. The total cost of the system in the image is around $18 (excluding shipping, 12th August 2017).
Whats next? Installation of MicroPython firmware on WeMOS D1 mini, and displaying temperature and humidity of the SHT30 sensor on the OLED-display. Stay tuned…